- Factory Certified Premium Teams
- Installation and Delivery
- Retrofits & New Installations
- Certified Installation Teams
- Laundry and Refrigeration Installation
- Dishwasher Replacement
- Downdraft Replacement
Resource Center
APPLIANCES
If you need service for an appliance, this is handled through the manufacturer. We are available to help you navigate the service process should you run into any difficulties resolving your issues. If you prefer, you can go directly to the manufacturer’s website to register your new appliance. Several of the listed websites will also allow you to set up the service thru their website. Please feel free to contact us directly should you need assistance setting up a service call.
APPLIANCE SERVICE & REPAIR BRAND CONTACTS
Phone: 630-238-1280
Website: https://lvdistributes.com/
Phone: 1-800-898-1879
Website: https://www.askona.com/customer-care-support/find-sales-and-service-support/certified-servicer
Phone: 630-238-1280
Website: https://lvdistributes.com/
Phone: 1-800-578-6890
Website: WWW.BOSCHSERVICE.COM
Phone: 1-800-637-1453
Website: WWW.BROAN.COM
Phone: 800-251-7224
Phone: 833-353-5483
Website: WWW.DACOR.COM
Phone: 1-877-435-3287
Website: WWW.ELECTROLUXICON.COM
Phone: 630-238-1280
Website: https://lvdistributes.com/
Phone: 1-888-936-7872
Website: WWW.FISHERPAYKEL.COM
Phone: 800-251-7224
Phone: 1-800-374-4432
Website: WWW.FRIGIDAIRE.COM
Phone: 630-238-1280
Website: https://lvdistributes.com/
Phone: 1-800-GE CARES(432-2737)
Website: https://genet.geappliances.com/eService/Service/home
Phone: 770-227-5122
Local-Southside
Phone: 1-877-435-3287
Website: WWW.ELECTROLUXICON.COM
Phone: 1-800-JENNAIR(536-6247)
Website: WWW.JENNAIR.COM
Phone: 1-800-253-1301
Website: WWW.KITCHENAID.COM
Phone: 800-243-0000
Phone: 1-800-223-3900
Website: WWW.LIFELUXURYMARVEL.COM
Phone: 1-800-253-1301
Website: WWW.MAYTAG.COM
Phone: 1-800-444-1845
Website: WWW.MONOGRAM.COM
Phone: 1-800-GE CARES(432-2737)
Website: https://genet.geappliances.com/eService/Service/home
Phone: 630-238-1280
Website: https://lvdistributes.com/
Phone: 1-800-237-4277
Website: WWW.SHARPUSA.COM
Phone: 1-800-735-4328
Website: WWW.THERMADOR.COM
Phone: 630-238-1280
Website: https://lvdistributes.com/
Phone: 630-238-1280
Website: https://lvdistributes.com/
Phone: 404-876-8179
Website: WWW.VENTAHOODGA.COM
Phone: 630-238-1280
Website: https://lvdistributes.com/
Phone: 1-800-253-1301
Website: WWW.WHIRLPOOL.COM
Phone: 630-238-1280
Website: https://lvdistributes.com/
COUNTERTOPS

FIREPLACES
Helpful Tips
- Close damper when not in use
- Optional glass doors can reduce draft
- Light pilot light if equipped
- A direct or B-vent fireplace can cool the room if the pilot is not lit depending on the outside air temperature
Proper Use & Maintenance of wood-burning fireplaces
Initial Lighting Procedures
- Be sure fireplace grate is pushed to the back of the fireplace.
- Check the fireplace damper to be sure it is completely opened.
- Clear all ashes from the top of the burner box of gas starter if your unit has that option.
- Strike a long match or use a long lighter and hold the flame near the burner box before turning the gas on. This will eliminate the build-up of gas and risk of sudden combustion.
- Burn the gas starter for approximately 4 minutes to warm the flue and create a positive draft before loading the fireplace with wood.
- If no gas starter-twist a sheet of news paper and light it, holding it as high up in the fireplace as possible. Once the smoke is being drawn up the chimney, slowly move the burning paper down and use it to ignite the kindling.
- THINK SMALL-start with wood like you are building a campfire.
Curing
- After warming the flue, place dry, seasoned hardwood, such as oak or hickory, on the fireplace grate.
- The first five fires should be relatively small. That is, only one or two logs maximum, to allow the firebrick in the unit to cure. Only after curing the firebrick is your unit ready for standard use.
- Be sure not to build excessively large fires and never burn pine, building scraps, garbage, or composite logs. Any of these can cause excessive creosote build-up and accelerate deterioration of the firebrick.
Standard Use
- Over time, hairline cracks will develop in the firebrick. This is normal and does not affect the safety or operation of the fireplace. If the brick begins deteriorating, it is available as a replacement part.
- Glass doors are available for your fireplace and are highly recommended. Their use prevents valuable heated air from escaping up the chimney as the fire is extinguished. They will also prevent sparks from damaging your carpet.
- Be advised that a specific set of doors has been tested and approved by the manufacturer for your fireplace and only that model should be used. Any other model could restrict air flow around the unit causing it to overheat and becoming a fire hazard.
Fireplace Safety
Keep Fireplaces Clean
- Have your chimney inspected and cleaned annually by a certified chimney specialist.
- Clear the area around the hearth of debris, decorations and flammable materials.
- Always use a metal mesh screen with fireplaces. Leave glass doors open while burning a fire.
- Keep air inlets open, and never restrict air supply to fireplaces. Otherwise you may cause creosote buildup that could lead to a chimney fire.
Safely Burn Fuels
- Never use flammable liquids to start a fire.
- Use only seasoned hardwood. Soft, moist wood accelerates creosote buildup.
- Build small fires that burn completely and produce less smoke.
- Never burn cardboard boxes, trash or debris in your fireplace.
- When building a fire, place logs at the rear of the fireplace on an adequate supporting grate.
- Never leave a fire in the fireplace unattended. Extinguish the fire before going to bed or leaving the house.
- Soak hot ashes in water and place them in a metal container outside your home.
Protect the Outside of Your Home
- Stack firewood outdoors at least 30 feet away from your home.
- Keep the roof clear of leaves, pine needles and other debris.
- Cover the chimney with a mesh screen spark arrester.
- Remove branches hanging above the chimney, flues or vents
Protect the Inside of Your Home
- Install smoke alarms on every level of your home. Test them monthly and change the batteries at least once a year. Consider installing the new long life smoke alarms.
- Provide proper venting systems for all heating equipment.
- Extend all vent pipes at least three feet above the roof.
Troubleshooting
NO GAS AT BURNER BAR
- Check cut off valve – either outside next to the chase or in the basement, crawlspace or mechanical room
- Clean the burner bar orifice with a paper clip
SMOKING BACK INTO ROOM
- Make sure the damper is open and the flue is not obstructed
- The correct lighting procedures may not have been followed – refer to fireplace manual
- The flue may be too short
- Improper termination height
- No grate or improper size grate – should be 2/3 the width and 1/2 the depth of the box’s interior dimensions
- It may be too hot outside – the idea temp is 50 degrees or below
BROKEN REFRACTORY
- Need to know model & serial numbers to order replacement refractory
- Custom brick may be cut if original brick is not available.

Step 1
Locate gas supply valve (typically behind bottom louver).

Step 2
Open valve by pivoting handle to be parallel to gas line.

Step 3
Locate pilot assembly with spark ignitor.

Step 4
Then, locate red or black ignitor button. Push ignitor to verify spark at pilot area.
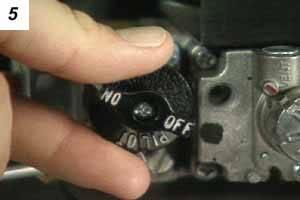
Step 5
Locate the black valve control knob (knob with the words “ON”, “OFF” and “PILOT” on it). Push in and rotate until the word “pilot” is at the indicator line.
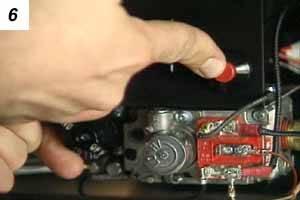
Step 6
While pressing and holding in the valve knob (in “PILOT” position – it should press in about 1/4″), press the red piezo button repeatedly until the pilot ignites. Once the pilot is lit, continue to hold the valve knob in for 30 seconds, then slowly release.

Step 7
If the pilot light goes out, service is required. Remember to shut the gas supply valve off. If it remains lit, press the valve knob in slightly and rotate until ON is at the indicator line.
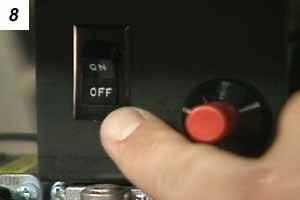
Step 8
Finally, turn the unit’s ON/OFF switch (or wall switch or remote control) to the “ON” position to start your fire.
Marble Use & Care Guidelines
Marble is a natural material and each set has its own unique characteristics. Marble sets with visible veining are not considered a damaged or defective product. Color variations are normal and also will vary from set to set.
DO’S and DON’T’S
- Do NOT stand on marble hearth.
- Do NOT stack firewood on marble hearth.
- Do NOT place potted plants on hearth as weight may crack marble and water overflow may stain.
- Do NOT drop fireplace tools or firewood on your hearth as it may crack the marble.
- DO use a coaster under soft drinks, coffee, fruit juices and any alcoholic or acidic liquids. Any liquid may stain marble. Even a sweating water glass left out overnight may imprint the stone with a water ring impression.
- DO blot up spills immediately to prevent staining.
- DO use steel wool and mild soap to clean crevices. An S.O.S. pad can be used lightly but may scratch black marble.
- Do NOT use products that contain vinegar, lemon juice, ammonia or alcohol to clean your hearth. Nor should you use cleaners that contain acids such as bathroom cleaners, grout cleaners, tub & tile cleaners, Windex or abrasive cleaners such as Soft Scrub.
CLEANING MARBLE
- Dust surface with clean cloth and then use only a mild liquid detergent like Dove with warm water on a soft, damp cloth.
- Rinse thoroughly with clean water and dry with a soft cloth.
- Once cleaned, you may apply polish recommended for marble surfaces.
POLISHING MARBLE
A good quality marble wax will minimize water spotting and prevent penetration of stains. A wax also enhances natural color and provides a high polished sheen. Super Diamond Wax is recommended; black for all black marbles and white for all other marble types.
- Apply wax in a circular motion with a clean dry cloth and allow a light haze to form.
- Wipe off wax with a steel wool pad and buff until a high polish occurs.
- Repeat process if a higher sheen is desired.
- Do not allow wax to dry for more than a few minutes as it will be difficult to remove.
FLOORING
We want your flooring installation to go smoothly. Please take a few minutes to read this guide to prepare you for your new flooring.
In order to maintain and protect your warranty coverage under the terms of these warranties, you must do the following: A minimum of one professional cleaning every 18 months is required.
A wet/dry vacuum cleaner is the best way to effectively remove stains. Use the attachment with the best suction and vacuum as much of the stain as possible, continuing to add water to the stain as you go. Treatment of the affected area should begin immediately upon discovery. The more time that elapses before treatment, the more difficult a stain will be to remove.
First scrape the food spill gently with a spoon or dull knife, removing as much solid material as possible. If detergent is required, use it sparingly and gently rinse the area with water while moving the vacuum wand back and forth. Use a towel to absorb all moisture.
If spot removal solvent is necessary, use a low residue carpet spot remover that has been approved by The Carpet and Rug Institute of America, apply several drops to a clean white cloth and blot the carpet in an inconspicuous area. If a color change occurs or color transfers to the cloth, consult a professional carpet cleaner.
Place towels or cloth over wet area and weight with a heavy, colorfast object to absorb moisture. Leave overnight. If stains remain after cleaning, moisten the tufts in the stained area with 3% hydrogen peroxide and let stand for one hour. Blot and repeat until carpet is stain–free. No rinsing is necessary. Apply a pad of paper towels and weigh them down, allowing the carpet to dry.
Some stains cannot be removed because they permanently alter the carpet’s color. These stains include acid toilet bowl cleaners, acne medication, alkaline drain cleaners, chlorinated bleaches, hair dyes, iodine, insecticides, mustard with turmeric and plant fertilizers. For these types of stains, call a professional.
Additional Tips
Beer, wine, coffee, and tea
Blot and neutralize with a white vinegar solution, then work a small amount of a detergent solution into the spot (1/4 teaspoon detergent per 1 qt. of water). Continue applying detergent and blotting until spot is completely removed. Using a spray bottle, rinse with tap water and blot to remove excess moisture. Apply paper towels and weigh them down, allowing the spot to dry.
Blood, ketchup, cheese, chocolate, cola, cough syrup, mixed drinks, soft drinks, soy sauce, starch, toothpaste, white glue
First, note that all solutions for removing blood must be cool in temperature. Blot and neutralize the spot with an ammonia solution, using a spray bottle to saturate the spot. Next, work a small amount of a detergent solution into the spot (1/4 teaspoon detergent per 1 qt. of water) and continue applying detergent and blotting until spot is removed. Using a spray bottle, rinse with tap water and blot to remove excess moisture. Apply a pad of paper towels, weigh them down and allow to dry.
Mud and dirt
Allow mud to dry completely. Shatter the dried mud with the handle of a knife, then vacuum. For dirt, apply a small amount of a detergent solution to the spot (1/4 teaspoon detergent per 1 qt. of water) and blot with a white paper towel to work the detergent into the affected area. Continue applying detergent and blotting until spot is removed. Using a spray bottle, rinse with tap water, and then blot to remove excess moisture.
More from the Carpet and Rug Institute
The Carpet & Rug Institute is the science-based source for the facts on carpet and rugs. This nonprofit trade association represents more than 95 percent of all carpet made in the United States. Learn more about the CRI by visiting the website at www.carpet-rug.org
Hardwood Flooring
Harwood flooring adds beauty, value and classic style to your home. Keep your floors from looking dull and grimy and keep them gleaming, gorgeous and clean!
Ceramic Tile Flooring
Well-known for its beauty, versatility, and durability, ceramic tile is perfect for any room in your home. It is generally easy to care for, but it does require some upkeep. Follow these guidelines on how to clean ceramic tile and ensure your flooring stays in sparkling shape for years to come.
Laminate, LVT (LVP OR WPC) Flooring
Laminate floors tend to require a special type of maintenance to keep them gleaming. Check out these quick tips on how to maintain laminate floors and keep them looking new.
Carpet Flooring
Protecting your carpet from daily wear and tear, stains and spills through proper maintenance can help extend your carpet’s life. Though caring for carpet can be a challenge, we have the proper tips to help keep your carpet looking new for years to come.
GARAGE DOORS
- New Garage Door Installation
- Garage Door Replacement
- Section replacement
- Spring Replacement
- Garage Door Openers
- Garage Door Remote Controls
- Garage Door Keypads
- Custom Carriage Doors
You can now Request Service for your Garage Door online
Some steps to help you identify and isolate your garage door operator woes:
- Check the power. Is the operator plugged in? Has a breaker been tripped? Do you need to replace the batteries in your remote?
- Is the operator trolley latched to the door (if not, you may have discovered your problem)? If so, disconnect the door from the operator by pulling the emergency release (red handle, attached to rope and latch) down and release the latch.
- DOOR WON’T GO UP: Once the operator and door are disconnected, try and lift the door manually. If the door is hard to lift or very heavy then the problem may be the springs, rollers or hinges rather than the operator itself. If the door is easy to lift, you should reconnect the door and try operating again.
- DOOR WON’T GO DOWN: Once the operator and door are disconnected, press the button to see whether the lights flash. Also, check that the door’s photo eyes are unobstructed and correctly positioned (sunlight, items dangling from the bottom of the door and ill-positioned eyes can set off the safety feature and prevent the door from going down.
Liftmaster Operator Programming
The following is a brief guide to help assist builders/homeowners with on site Liftmaster operator repairs. Full instructions are available on the web at www.liftmaster.com.
- Remotes and operators must operate on the same frequency- be sure to check operator model number!!
- For Homelink instructions, see attached instructions or the web at www.homelink.com
SETTING REMOTES
- Press and release learn code button (purple, red, green) on the back of the motor head.
- Press the remote for that door 3-4 times until the door begins to move.
- Repeat steps 1 and 2 to program additional remotes to additional doors
- If programming a multiple button remote to additional doors, repeat steps 1 and 2 for the additional buttons.
SETTING KEYPADS
- Press and release learn code button (purple, red, green) on the back of the motor head.
- Within a few seconds, Press your personalized four digit code on the keypad and then press and release the “enter” key 3-4 times until the door begins to move. (be sure not to block the sensor eye beam while setting the keypad or set code prior to mounting keypad.
- Repeat steps 1 and 2 for additional doors. (one keypad can be used on several doors)
GARAGE DOOR OPENS BY ITSELF OR 1 REMOTE OPENING MULTIPLE DOORS
- Ensure all remotes are off.
- Clear memory by pressing and holding the learn code button (green, red, purple) on each motor head for 10 seconds.
- Reset all remotes/keypads per above.
GARAGE DOOR OPENS WITH REMOTE/WALL BUTTON, BUT WILL NOT CLOSE WITH REMOTE OR WALL BUTTON, DOOR WILL BEGIN TO CLOSE, BUT REVERSES IMMEDIATELY AND LIGHT BULB FLASHES. GARAGE DOOR WILL CLOSE IF THE WALL BUTTON IS PUSHED IN AND HELD.
Most likely, this is a problem with the sensor eyes
- Ensure sensor eye wiring contacts, where spliced into pre-wire, are connected properly. If not, splice properly.
- Check that the 2 sensor eyes mounted on the track, are:
- If sensor is illuminated weakly or flashing, adjust sensor eye by moving slightly up, down, in, or, out until it becomes solid.
- If sensor eyes will not illuminate, more detailed maintenance is required.
- Mounted at the same height on both sides
- Light not flashing or very faint, and there are no obstructions blocking the sensor beam such as spider webs, garbage cans, paint, etc. Each sensor eye should have a small fluorescent light that is illuminated.
OPERATOR WILL NOT OPEN OR CLOSE AND HAS NO POWER
- Ensure outlet has power.
- Sometimes, the operator will overheat or sustain a power surge. If this occurs, unplug the operator for 10 minutes and plug back in. If the operator does not work after this, further detailed maintenance is required.
Troubleshooting Guide
DIAGNOSTICS FOR FLASHING COURTESY LIGHT ARE LOCATED ON BACK OF OPERATOR AND IN MANUAL
Operator works from wall station but not transmitters
- Check operator for number of fl ashes from courtesy light.
- There should only be ONE lighted wall station attached per operator.
- Check vacation switch.
- Use your Linear FT-1 to verify transmitter is working. If not, replace battery.
- Check receiver with FT-1 to verify it is working. If not, replace control board.
- Learn transmitter into operator.
- If learn LED light on operator is fl ashing rapidly or constant red, radio receiver is experiencing interference.
- If interference is present, use the FT-1 to locate interference
Operator works from transmitter but not wall station
- Check wall station wiring. Should be on terminal one and two at operator.
- Check rear of wall station for “bunched or binding” wire against board.
- Check wall station wire for shorts.
- Replace wall station.
Door goes down a few inches stops and reverses
- Check operator for number of fl ashes from courtesy light. (Four fl ashes.)
- Check for proper balance of door.
- Check door force settings.
Door goes down a few inches stops and reverses
- Check operator for number of fl ashes from courtesy light. (Four fl ashes.)
- Check for proper balance of door.
- Check door force settings. (Three fl ashes.)
- Check beam alignment and beam wires for shorts.
- Check for proper connections at beam and at operator.
- Replace beams.
- If door goes down all the way by holding constant pressure on wall station YOUR BEAMS OR BEAM
- WIRES ARE THE PROBLEM! (DO NOT REPLACE LOGIC BOARD!)
Door goes up without activating transmitter or wall station
- Check wall station wires for short.
- Check that wall station screws are not over tightened.
- Check all connections at operator and wall station for proper connections and for broken or touching wire ends.
- If problem still exists, erase and then reprogram all transmitters and wireless keypads.
Transmitter will not learn into operator
- Check transmitter and radio receiver using your FT-1.
- If learn LED is solid or has a rapid fl ash the radio is seeing interference. Receiver cannot learn transmitter until interference is removed.
- Using your FT-1 locate and remove interference.
Door will not open all the way out of the opening
- Operate door to its down limit. Determine carriage location.
- The distance from back of pulley assembly bracket to front of carriage is 4”-6”. If not, relocate carriage to proper position per the installation instructions.
Operator will not go into vacation mode
- Vacation mode only affects the transmitter. Door will still operate from wall station.
- Operator must be on the down limit before unit will go into vacation mode.
- Vacation mode will not operate if an external receiver is installed.
- Replace wall station.
Unit will not operate from wall station or transmitter
- Four fl ashes – let operator cool down for 10-15 minutes.
- Check house AC power.
- Disconnect all wires from terminals. Short across terminals 1 & 2 Operator should start up or will go down with constant short on terminals.
- Check all wires for installation to correct terminals and all connections for shorts.
- Check wire harness connections to logic board.
- Check capacitor.
- Check limit assembly to make sure both limits are not closed.
Unit will not stop on up or down limit
- Check limit wiring connection to the logic board.
- Check wiring to limit assembly.
- Check door travel on limit assembly for proper contact with up or down limit.
- Replace limit assembly.
- Replace control board.
Light bulbs burning out
- Check unit for excessive vibration.
- Replace bulb with “rough service” bulb.
- Check bulb installation for tightness and or cross threading.
- Check socket threads and center contact.
- Replace socket assembly.
Short range from transmitter – Radio interference
- Check transmitter battery.
- Try a different MEGACODE transmitter.
- Radio interference is identifi ed by a fl ashing or solid learn LED.
- (a) If multiple operators in the same garage check for fl ashing or solid learn LED’s on ALL operators. If this is the case, you have outside interference. Use your FT-1 to determine the cause of the interference.
- (b) If only one of the operators’ learn LED is on, you probably have crosstalk between units. This can be confi rmed by unplugging the unit(s) that is not showing a solid learn LED and then the problem unit starts to work properly. If this is the case, cut the red jumper on the back of the control board on the unit that was unplugged. Note the older units did not have a RED jumper. If you have an older unit, replace the control board
Learning Linear MEGACODE transmitters into “most”
HomeLink systems
- Refer to vehicles installation manual.
- MEGACODE transmitters only transmit for 10 seconds.
- Press and hold transmitter button down for 8 seconds then release and quickly press and hold again. Repeat until transmitter learns into the HomeLink receiver.
